

Your cart is currently empty!
EMC Security Android App User Guide

1. GET STARTED
2. DOWNLOAD THE EMC SECURITY APP
3. SIGN IN
4. MAIN DASHBOARD
5. SECURITY ALARM FEATURE
6. SETTINGS
7. LIGHTS, LOCKS, THERMOSTATS, CAMERAS
8. ACCOUNT AND USER MANAGEMENT
1. GETTING STARTED
With the EMC Security app, you will be able to gain complete control over your home by having access to your security system, lights, locks, thermostats, cameras, and garage doors.
2. DOWNLOAD THE EMC SECURITY APP
The free Android EMC Security app can be downloaded in the Play Store for Android devices.


3. SIGN IN
You will receive a username via email. The password is abcd1234. Once you have installed the application, enter in your Username and Password. If you have forgotten your password, use the “Forgot Password” link to have a temporary password sent to your email address. Every time the application is launched, it will check to see if any changes have been made to your account.
To change Username and password to the app, click this link to the website. Once there, please follow the instructions below:
- Login in using the username and password above
- Login in using the username and password above
- Click on Contact List
- Select on your current Login Name (this will usually be your first name and last name)
- Click on Change User Name or Change Password
- Enter your new User Name or Password and click on submit the Sign In screen, press the menu at the top left and select Logout.
4. MAIN DASHBOARD SCREEN
Application Menu
At the very top of every screen, you will see the EMC Security application menu.
Three stacked bars (hamburger menu): Located at the top left, this menu allows for selecting your “Location” if you have more than one security system. It allows quick navigation to other application features. It also allows a primary user to edit sub-users of the account through the Manage Account menu.

Location Name: Located just right of the hamburger menu is the name of the security system for which your app is currently showing status. Users that have a business or a vacation home can select from these locations via the hamburger menu.
Pen icon: The Location name can be changed by clicking the Pen and editing the System name. This is used to create favorites on the app.
Z Wave icon: If your Connect+ panel is equipped with the optional Z Wave automation card, this icon will allow you to perform device inclusion/exclusion functions. Please contact your dealer or refer to the device documentation for specific processes, as they vary among manufacturers.
Bell (silent) icon: If your security panel is in a Trouble condition, clicking this icon will silence trouble beeps. Please refer to the section on Troubles for more information. This icon applies only for the SECURITY feature.
More menu (three stacked dots): This menu is also Feature specific and is used to provide access to Feature settings that are less commonly used. For example, in the SECURITY feature, this menu allows the application user to select whether to arm silently and/or to specify that the panel be armed to allow No Entry Delay. A No Entry Delay might be used for an Arm-Stay mode when everyone that would potentially disarm the system is already inside the business/home (no one else is expected).
5. FEATURES MENU
The feature Menu content will vary depending on whether your security system has an automation option card installed. The primary feature of the Alula application is SECURITY. If you do have an optional automation card installed the menu will include: SECURITY, LOCKS, LIGHTS, GARAGE DOORS, THERMOSTATS, & SCENES.
SECURITY FEATURE
In the Feature Menu, you will notice that SECURITY is bold and underlined. If it’s not, please press it now. The state of your security panel is shown in bold text directly at top center. If the security system is Disarmed, three arming icons are shown in the middle of the screen to allow one click access to arm your security panel.

ALARM STAY
In the Feature Menu, you will notice that SECURITY is bold and underlined. If it’s not, please press it now. The state of your security panel is shown in bold text directly at top center. If the security system is Disarmed, three arming icons are shown in the middle of the screen to allow one click access to arm your security panel.
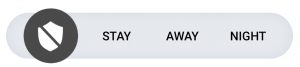
ALARM AWAY
Arming your system for Away is used when the secured home or building is expected to be unoccupied. All exterior sensors and interior motion detectors are active once the system enters Away mode.
ALARM NIGHT
Arming your system for Night is used when the secured home or building is expected to be occupied, but specific areas within the home or building are not expected to be used. All exterior sensors are active and typically some interior motion detectors are active when the system is armed to Night mode. An example of this may be a motion sensor in an attached garage or unoccupied basement.
DISARM
Disarming your system through the application is configured to require a valid user PIN by default. Enter your PIN and press SEND to disarm the system. Through the SECURITY settings (detailed below) the application can be configured to not require a PIN.
Please ensure that your mobile device has a security code or other security feature of its own so that an unknown user of your mobile cannot compromise your home or businesses security panel.

SECURITY FEATURE CONTEXT MENU
STATUS
Press the Status icon to return to the Arming / Disarming screen of the application. The Status screen is the default starting point within the app. This screen was shown as the Main Dashboard above.
ZONES AND BYPASSING
Press the Zones icon to see all your security sensors and their zone names. On this screen you can see all active zones, and can bypass zones to allow arming with zones open. An active zone sensor will be included in the protection algorithm where a bypassed zone sensor will not. An example would be to bypass a window zone to allow it to remain open on a hot night while allowing the system to arm.
Each user of the security system must be granted (or denied) bypass rights to allow that user to bypass a zone. Refer to the section on User and Account Management for additional details.
EVENTS
The Events screen shows system activity and the system user that initiated each event.
TROUBLES
The Troubles screen shows any problems that are present with your security system. Examples include; loss of AC power, temper conditions on the sensors, low battery on a sensor
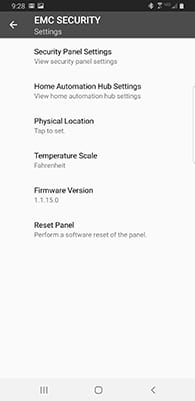
6. SETTINGS
The Settings screen allows you to change and configure app and security system features and settings.
Require PIN to disarm: This setting is on by default. When on, the mobile device user must enter a valid security system PIN and press “SEND” to disarm the system. When off, the application presents a single button to disarm the security system. In this case, you must ensure the security of your phone.
Reset Connect+ Panel: Allows the application to initiate
a soft reset of the panel remotely
Reset ZWave Module: Allows the application to reset the Z Wave automation module if it is installed in your Connect+.
Physical location: The application can inform the panel where it is located. This information is used by the panel to calculate sunrise and sunset times for automation events.
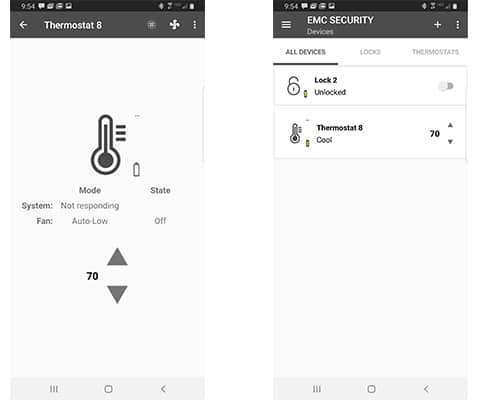
7. LOCKS, LIGHTS, GARAGE DOORS, & THERMOSTATS
If your security system includes an optional automation card, these device categories are enabled on your system. These device categories allow you to quickly select and manually operate your automation devices attached to your system.
SCENES FEATURE
The Scenes Feature is available if your panel includes an optional automation card. Scene control is a very powerful feature of the security system. Please review and test carefully each scene you configure.
Scenes allow a type of when-what control to be automatically executed by the security system. When any of a set of “Triggers” occurs, the system executes What “Actions.” It is important to repeat that any trigger configured within a scene will cause the configured Actions to be executed.
CREATE/EDIT A NEW SCENE
Press the SCENES title in the Feature Menu. To edit an existing scene, click its title in the list of scenes shown.
To create a new scene (example: Auto Arm Away at 9am):
1. Tap the “+” sign in the Application Menu – at the top right.
.2. Enter a name for your new scene – “Auto Arm 9am” for example.
3. Select your new scene from the list of scenes in the scene list. Notice that it is created “Inactive”.
4. When you tap the scene you will see Triggers and Actions. Tap the “+” on the Triggers section of the screen.
5. Triggers are the “when” of a scene. If any trigger is true, thenthe scene’s actions will be executed. Triggers can be grouped as:
a. Security Triggers
b. Time/Date Triggers
c. Automation Device Triggers
6. Some triggers requireconfiguration – For example,select “Once a Day”and configure the time to 9am.6. Some triggers requireconfiguration – For example,select “Once a Day”and configure the time to 9am.
7. Actions are the “what” of a scene. Actions can be grouped as
a. Security Actions
b. Automation Actions
8. For our example, tap the “+” in the Actions section and select “Arm or Disarm the System”
a. Configure the Action to “Arm Away”
9. Let’s say you have some Z Wave lights you want to turn off as well
a. Click the ”+” and add any additional Actions (Z Wave All Off might be a good one)
10. Remember to click the toggle to “Activate” your new scene.
8. Account and User Management
The primary account holder may create additional sub-accounts within the platform.
To create Sub-Accounts:
1. Tap Manage Account or Users in the Application Menu (top left hamburger menu).
2. All existing accounts will be shown and may be edited.
3. Tap the red “+” sign at the bottom right
4. The username must be unique within the system
5. Enter all required parameters for the account creation.
6. Tap the new user to grant the user access to one or more security systems on the account[screen -“Granted”].
7. Tap User Options to apply additional role based security. Please note that the user PIN code for the security system is assigned inside the User Options. It must be unique among all users of the panel.
8. Additional information about the user can be entered by clicking Contact Info at the bottom of the screen.